Tag : facebook

How To Create Awesome Overlays For Your Facebook Live

Go! Blog Image Templates (900x350)
31May

Are you ready to learn how to create Facebook Live overlays?  Before we get started we wanted to give you an opportunity to check out our extremely popular Secrets to Zoom Success ebook – get yours below!


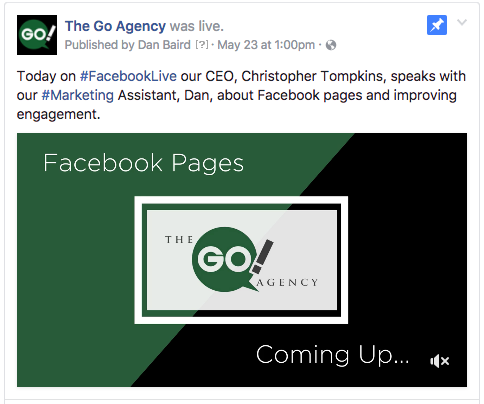
Now’s let’s get to it! If you’ve watched our Facebook Live videos, you’ve probably noticed that before we start, we have an image teasing our live video.

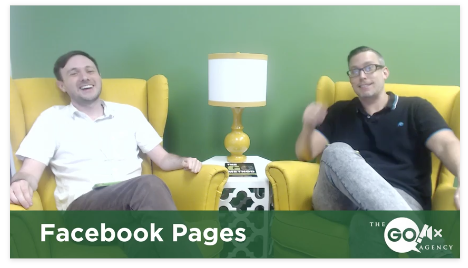
Throughout the video, we have an overlay underneath.

Then at the end, we have another image thanking our viewers for watching.

Overlays are a great way to make your videos look more professional and sleek. But the good news is they’re really easy to do. Which I’m about to show you.

1. Create The Overlay

To create our overlays, we use Canva. But you could use any image editing software. The main thing is, the image software has to let you do transparent backgrounds.

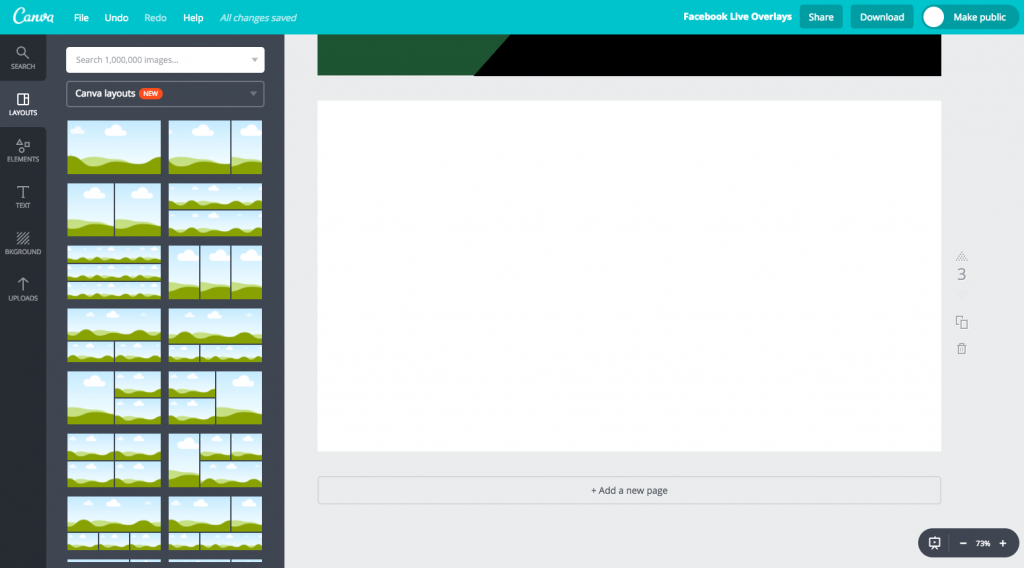
First, create an image which is 1280 x 720 in size. This is the standard size for a Facebook Live video. The image needs to be the same size, so it fits over the video perfectly.

From there, it’s a simple case of designing the image for how you want it to look in your video.

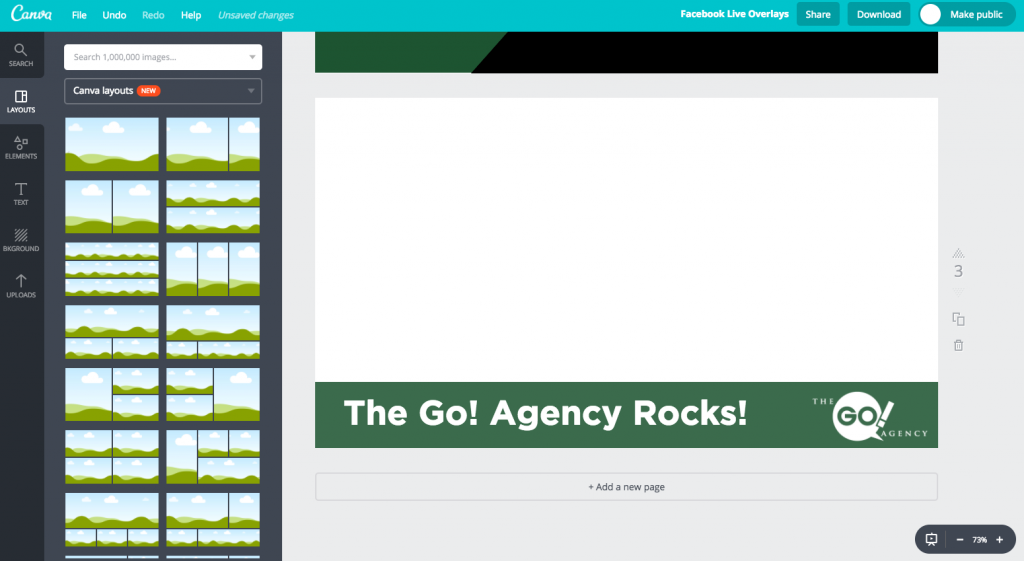
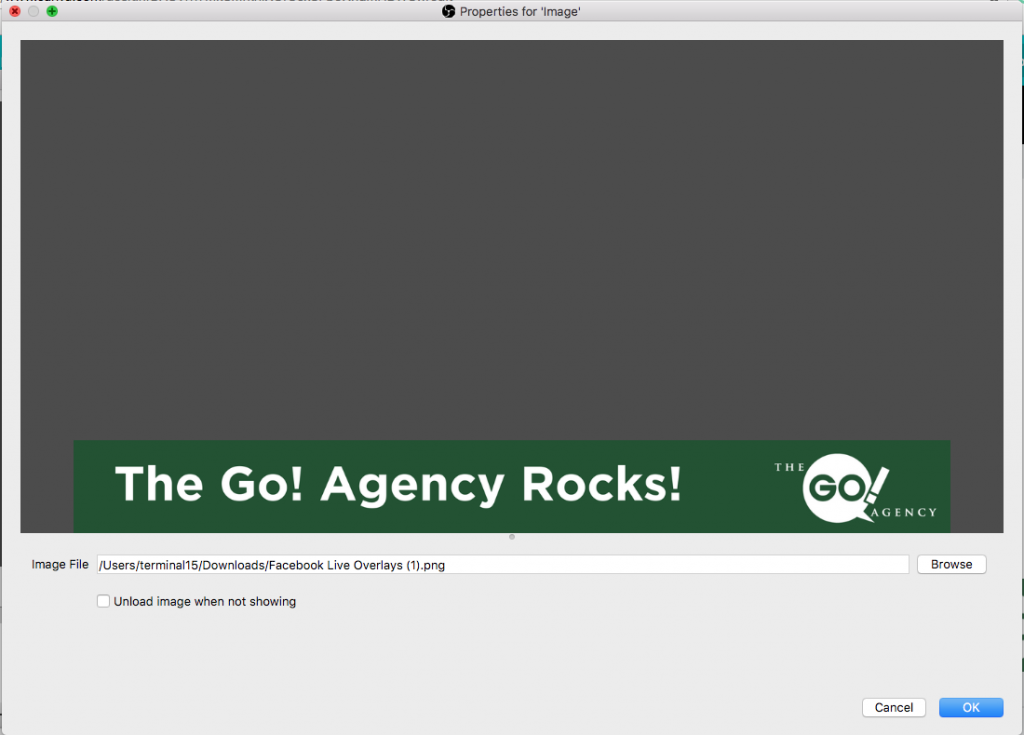
Here, I’ve decided I want a bar at the bottom of the screen saying “The Go! Agency Rocks!” (Tip: If you make your bar a little transparent, you’ll be able to see a little of the video through it which makes it look nicer.)

Now you’ll notice the rest of the image is blank. That’s a good thing. As mentioned, I want my background to be transparent for later, so I’ll be able to see the video.

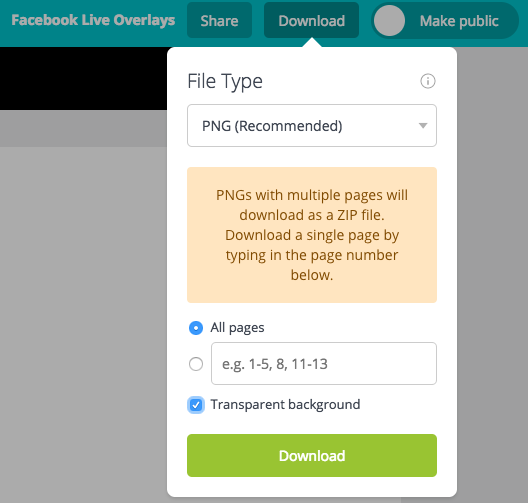
When I now save the image in Canva, I have to tick an option for a transparent background.

Whatever imaging software you use, make sure the image is saved with a transparent background and in a file that supports transparency (like a PNG). (Have I mentioned transparency enough yet?)

Ok. Step 1 was easy. Your image is done. Now how do you get it onto your video?

2. Using Open Broadcaster Software

Open Broadcast Software (OBS), is free software used by streamers in order to direct their videos and to add overlays.Instead of running our Facebook Lives through Facebook, we run them through OBS, which sends the information on to Facebook. That allows us to edit the video we send in real time.

Once you’ve got the software installed. Open it up. It will look something like this:
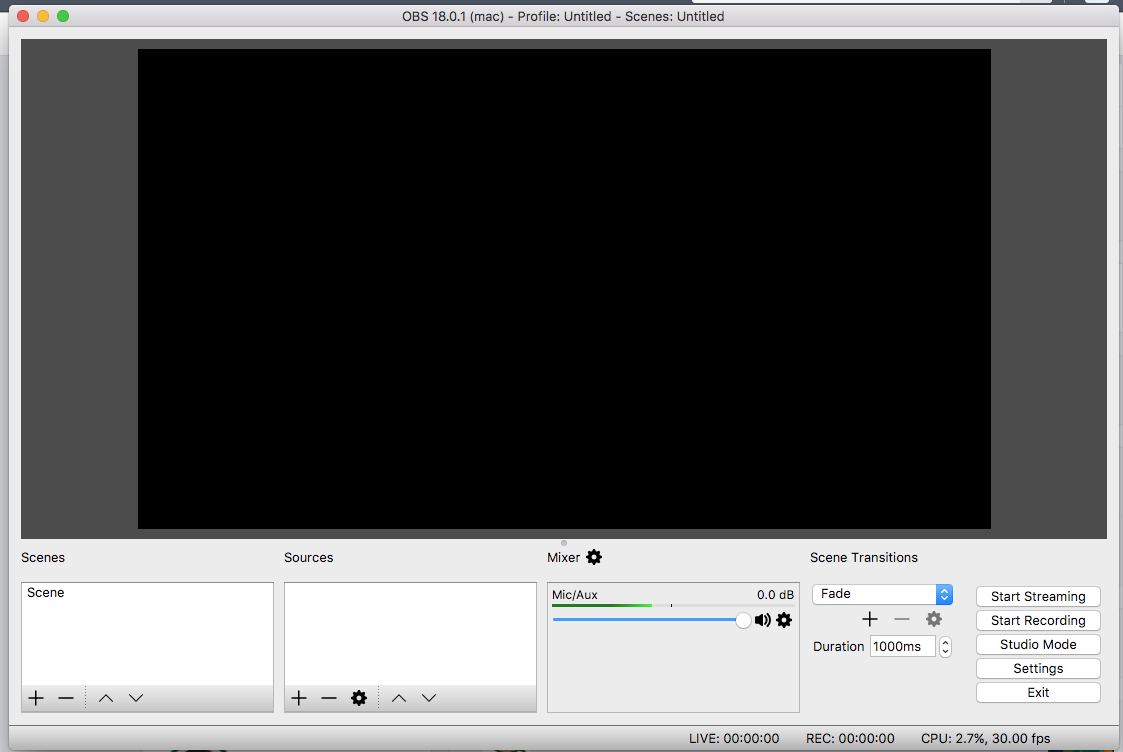
At the moment, we haven’t told the software what we want it to show, so it’s blank. So let’s first add our webcam.

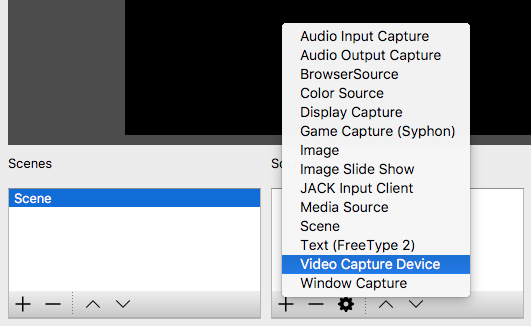
Click on the scene on the left-hand side. Then click the ‘+’ under Sources. This will allow you to add a source (choose what you’d like to show).

In this case, we want to choose our webcam so we’ll choose “Video Capture Device”.

 We can then name the device (default is fine) and click OK.

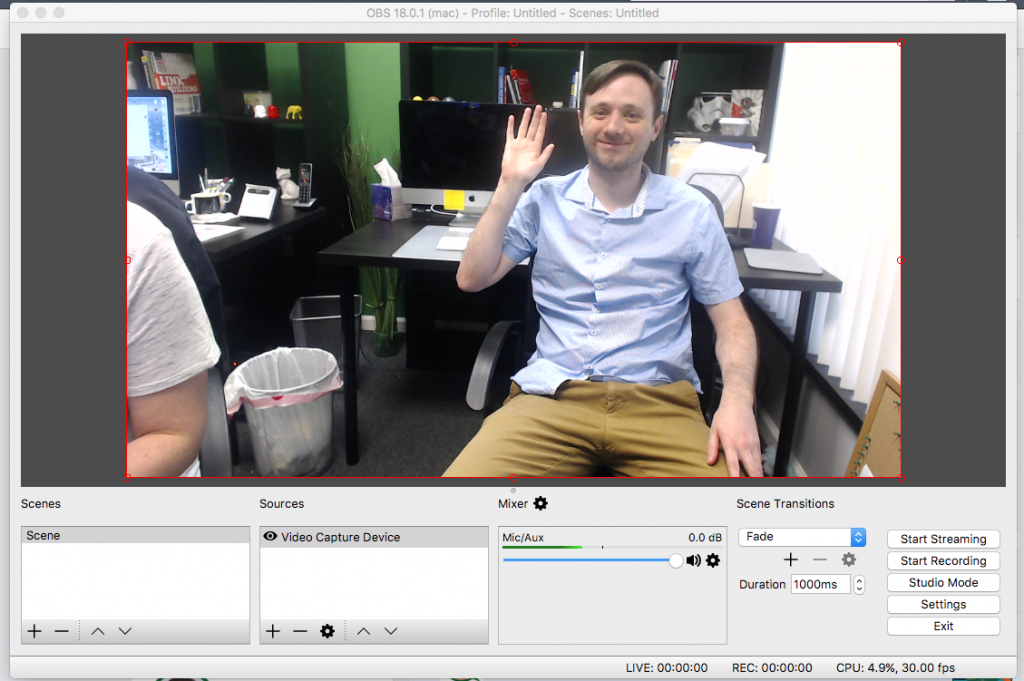
Then it’s just a simple matter of choosing the webcam we want to use. Choosing a preset (the larger the better) and clicking OK. Your webcam video should now show on the main screen of OBS.

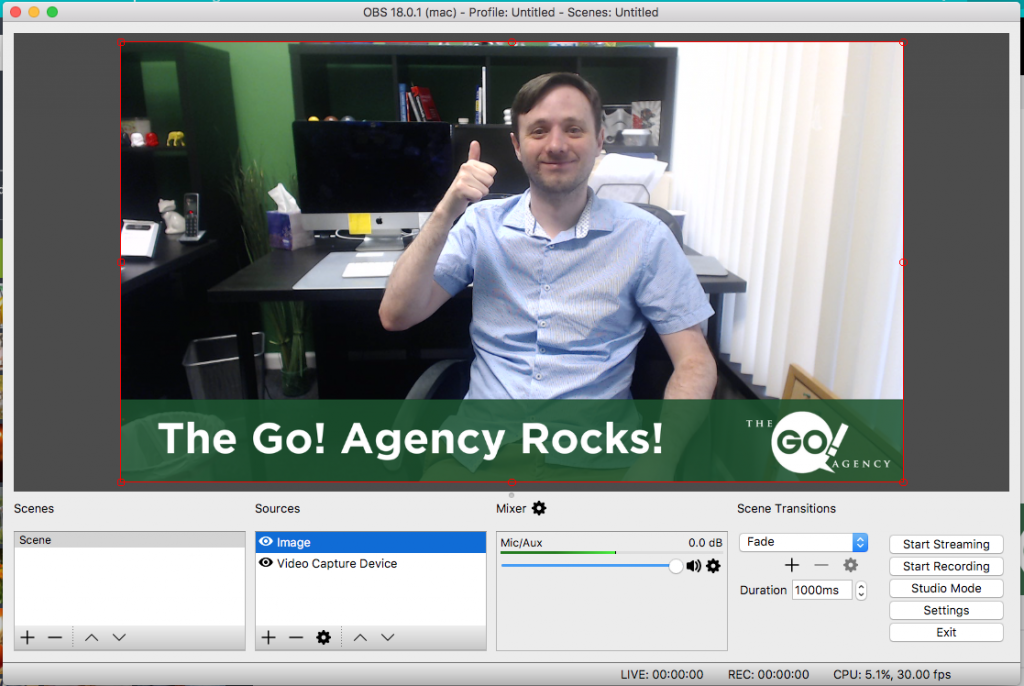
Here’s our Marketing Assistant, Dan to demonstrate how it should look.

Now you need to follow the same step again to add your overlay. Click the ‘+’ under sources. This time choose “Image” and then choose the overlay you created. It should look more or less like this:
Once you click OK, it should automatically show above your video as an overlay. Our wonderful model, Dan, again demonstrates:

As I mentioned (multiple times) earlier, the top of my image is transparent. If it wasn’t, you’d be unable to see the video because it would be hidden beneath the image.

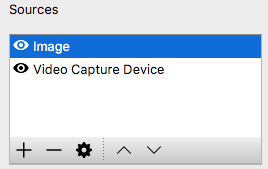
If you look at your list of sources, it should now look like this:

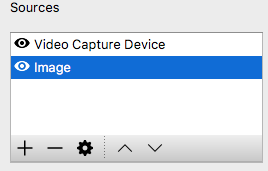
Your Image is on top and your Video underneath it. However, if you pulled the image down below the video, like so:

You’ll notice your overlay has disappeared in the preview above. Why?

Because your video is now on top of it!

Your video isn’t transparent, so you can’t see anything behind it.

Think of the top source as a piece of paper, the source beneath it as another piece of paper. If the top piece of paper is transparent, you’ll be able to see the next piece of paper. If the top piece of paper isn’t transparent at all, everything beneath it will be hidden.

So always make sure your overlays are transparent and above your video in your OBS Sources. Otherwise, you may not see them!

Now you’ve figured out how to add overlays to your video. See, nice and simple. But how do you start up your Facebook Live?

Well, I’m going to leave you on a cliffhanger I’m afraid.

Find out next week when I teach you how to start your stream from OBS and how to do some cool scene changes.

Can’t wait? Then sign-up to our newsletter below!


Read More

Is It Possible To Game The Facebook Algorithm?

Copy of Go! Blog Image Templates (900x350) (4) 4.43.06 PM
24May

If you want to succeed on Facebook, you have to learn to play by its rules. That means learning about the Facebook algorithm and creating content that makes the social network work for you, rather than against you.

But can the algorithm be gamed, so that your posts show up on everyone’s feeds? Can you use your knowledge of the algorithm to help you create your content?

First, let’s go back to the start and find out just what the algorithm is.

What is The Facebook Algorithm?

You’ve probably heard a lot of us marketers talking about the Facebook algorithm. Most often while tearing our hair out and crying, “Facebook have changed their algorithm again! WHYYYYYY!? WHYYYYY!?”

But what is the Facebook algorithm anyway?It’s just a fancy way of saying, “How Facebook sorts content.”

When people go on about the algorithm changing, they’re just saying that Facebook is changing how it shows content to users.

Why Sort Content?

To understand why Facebook needs to sort its content, I want to take way back in time. To the far reaches of history.

The year 2004.That’s when Facebook first popped into existence. Although it wasn’t until a few years later than it took off.

Back then, it was only you and your friends. Not many of your friends either. So what Facebook showed you didn’t matter. It just showed you anything your friends posted.

Then Facebook got popular. Really popular. Not only were your friends on there, but your favorite bands, local businesses, and every celebrity alive.

Which meant that the average user was connected to dozens of friends and dozens more pages and groups. All of which were posting content.

At this point Facebook had two options:

It could continue to show you everything posted by your connections.

Or:

It could curate all those posts, choose the best ones and send those to you instead.

The second option was the only feasible one. Thus the Facebook algorithm was born.

How The Facebook Algorithm Sorts Content

In simple terms, the Facebook algorithm shows a user exactly what they want to see (or what Facebook believes they want to see.) How the algorithm figures this out is by studying a users behavior over time and collecting data.

In more complex terms, Facebook takes every post from every one of your connections (friends, pages, groups), gives each post a score, then sorts the posts from the highest to lowest. That list becomes your news feed – which is created every time you visit Facebook.

Facebook uses thousands of variables from each user to score posts and choose what to show. But at the same time, Facebook weighs posts based on its company strategy.

From experience we know that the following are important factors in what Facebook shows a user:

  • Friends over pages. Your friends and what they post are scored higher than what pages post. Facebook is primarily a social network, so your friends get a bump over everything else.
  • Type of content. Facebook believes certain types of content are more interesting to users than others. A text only update is at the bottom of the ladder, followed by an image, with video above and live video at the top.
  • Timeliness. Straight after a status update is posted its at its strongest, then over time that strength degrades. Facebook knows users won’t be interested in something a friend posted last week, so the older a post is, the less likely you are to see it. Other, newer posts will easily trump an old post.
  • Post Engagement. The more engagement a post gets, the more it will show up in other feeds. Especially if the engagement happens quickly. If you’ve got engaged or are posting about a big accomplishment, a lot more of your friends will engage with it meaning a lot more will be shown it. Similarly, for a business, the more engagement a post gets, the more it’ll show up on the feeds of your other followers.
  • Personal Engagement. If you engage a lot with a certain person or page, you’re more likely to see their posts. In my case, I click on a lot of posts from the BBC News, so Facebook seems to always show BBC News articles in my feed. Which is fine as I keep clicking on them!
  • What you’ve already seen. Have you ever been on Facebook, seen a post at the top of your feed, then gone back to find it a minute later only for it to suddenly have vanished? Since Facebook knows you’ve already seen the post it decides that you’d rather see other content instead of it now.
  • Trendiness. If the topic of a post is a topic that has been trending, Facebook will give it a bump. If you’re posting about the Superbowl while it’s happening, your post is more likely to be seen.
  • Your preferences. If you’ve decided to hide the posts of a friend or page, they’ll never get shown no matter how amazing they are. But Facebook also looks at your user behavior to figure out your unsaid preferences.
So the question is. Since we know all of the things that Facebook uses to weigh the content it shows. Is there a way to game the system?

Working With The Facebook Algorithm To Increase Engagement

The bad news first:

There is no way to game Facebook’s algorithm.

Every user on Facebook is different, so what they see is different too. It would be impossible to create content that ticked the boxes for every user connected to you. No page could reach every one of its followers with a single social media post.

The good news is:

There are a few techniques you can use to increase the engagement and visibility of your posts.

  • Focus on content that is more immediately engaging. Something that makes users stop their scroll. A photo or video will stop a user for a moment and make them more likely to interact with the rest of your post.
  • Posting at the correct time. Since a post degrades over time, make sure to post when more people are likely to see it. However bear in mind that that’s when everybody else will be putting up their content too, so you’ll be facing off against other people.
  • Use trends to your advantage. Can you create a post that is relevant to a current trend? Is a current news story connected to your business in some way? If so it’d make the great basis for a post.
  • Use Facebook Live. Facebook is getting behind its Live video, so gives it a major bump in other people’s feed. Even sending everybody a notification to say you’ve gone live.
  • Investigate your audience. Create content they want to see. Use your audience insights to find out what age your followers are and what type of people. You can then tailor your content toward them.
  • Vary your content. If you continuously post the same type of content to your page, you’ll bore your dedicated followers. But you’ll also miss out on followers that aren’t interested in that type of content. User A might love your photos but hate your videos. User B might love your videos and hate your photos. To please them both, you need to make content for them both.
  • Stay up-to-date with Facebook. Facebook isn’t shy about expressing its goals. It wants to make Facebook more immersive for everybody. With that in mind, a lot of its future focus is on 360 videos, alternate and virtual reality, and chatbots. With that in mind, it only stands to reason that those things will find favor in the algorithm. Staying up-to-date with Facebook is an important way to see what it thinks is relevant.

Remember above all, Facebook will show users what they want to see. If you make terrible content that nobody would want to look at, then nobody will see it. It’s just as simple as that.

So the golden rule is:

Create meaningful content that your connections want to engage with.

That’s the best way to work the system.


Read More

Facebook Live Anxiety And How To Deal With It

Facebook Live Anxiety And How To Deal With It
11May

For over a month now, we’ve been going on Facebook Live each Tuesday to talk about social media. Everybody at the agency has had a chance to show off some of their expertise, but I’d be lying if I said that we’re all in love with doing Facebook Live.

It’s strange, but when you take a camera and point it at somebody, even if they’re the most confident, outgoing person in the world, they may start to clam up a little. A camera adds pressure, it’s almost like a challenge shouting, “PERFORM!”

It’s no surprise that Facebook Live makes some people nervous then. It’s like public speaking in many ways, some may even say it’s worse. When you do a presentation in public, chances are it won’t be recorded. If you make a mistake, nobody will remember it after a moment. But with Facebook Live that mistake could exist forever. Right?

If you’ve done your own Facebook Live, you’ll probably know what I mean. It can definitely make you a little anxious. You might even feel so bad that you decide that Facebook Live isn’t worth it.

However, I have a few tips which I find calm the nerves before we do a Facebook Live. So that everything goes smoothly and I don’t have to worry.

1. Preparing For Facebook Live Is Key

Some people are great at improvising. They can talk for hours on a single topic barely stopping for breath.

But Facebook Live isn’t the place to improvise. Without a plan, you’re just adding to the pressure.

Before we do a Facebook Live, we write an outline for the recording, including certain talking points to hit, tips to give and discussions to have. We choose a theme and structure for the show.

That way everybody that’s appearing will know what we’re talking about, so they can do a little research or prepare what they’d like to say.

Nobody is put on the spot, so we can all feel confident once we click, “GO LIVE!”

2. Use your knowledge

If you know nothing about a topic, it’s common sense that you shouldn’t talk about it. Stick to discussing things you know a lot about.
It’s much easier to give an opinion about something you’re knowledgeable about, rather than trying to make something up. The result of which could make you look like you don’t know what you’re talking about. (Because you actually don’t!)When we do a Facebook Live, we try to have participants that know lots about the topic up for discussion. Our Social Media Manager, Alyssa knows lots about Instagram, so she’d be a perfect pick when we decide to talk about it.

If you talk about what you know, you can be confident that any questions or discussion will be easy for you to handle. So you can focus more on how you say something rather than what you’re saying.

3. Relax

Everybody gets nervous when it comes to public speaking. It’s easy beforehand to panic about all of the things that could go wrong.

But the truth is, people are a lot more forgiving when it comes to mistakes on Facebook Live than they would be elsewhere. Nobody expects you to be a professional news anchor, they know that Facebook Live isn’t your day job. So they won’t be very critical.

If something goes wrong, it won’t be the end of the world.

4. The most important rule

Have fun! The more you enjoy doing your Facebook Live, the more entertaining you’ll be, and the more people will want to watch you. Having fun will help you relax and before you know it your Facebook Live will be over and you’ll be ready to do another one!

If you want to see our previous Lives, you can visit our Facebook page and click on the videos tab.

Read More

4 Ways Simplicity Is Best For Social Media

4 WAYS SIMPLICITY IS BEST FOR SOCIAL MEDIA
9May

When people log on to Facebook, Twitter, Instagram, or another platform, they are immediately bombarded with enough content to make their head spin. With millions of tweets to read, comments to like, and live videos to stream, just viewing social media could be a full-time job! This, in a nutshell, is why simplicity is key.

People do not have time to try and decipher your message. They like clear-cut, concise ideas that are presented in the most convenient fashion possible. How can your brand adapt this simple philosophy?

Check out these 5 methods of keeping things simple with your online marketing.

1. Short, punchy sentences.

When you are writing social media content, take a step back and try to determine which words are absolutely necessary. Take out anything extra and while you’re at it, replace weak words with stronger ones. This will help your message get across in a reader-friendly fashion.

2. “Iconic” imagery.

A rule of thumb in the world of graphic design is “if your design can’t be recognized when it’s on a billboard and you’re speeding by a 70mph, then it’s not an effective design.” Simplicity is the answer for designers and as such, your visuals should be instantly recognizable as online viewers “speed scroll” through their news feeds.

3. Call to actions.

Don’t make your readers have to go very far to visit your website. Provide a link and most importantly, make sure it takes them to exactly where you want them to go, whether a homepage, landing page, contact form, etc.

4. Numbers and bullets.

Imagine this article without these ideas being broken down into numbered points. It would be just a blocky mess. Breaking down information, specifically blogs and social media articles help your reader to take easy, digestible bites and understand the overarching takeaways.

So, let’s not waste any more time. It’s simple. Get to work on social media marketing!

Need help with social media? Contact us today!

Read More

Why Is Everybody Jumping On The Snapchat Bandwagon?

Copy of Go! Blog Image Templates (900x350) (3)
3May

Life is filled with fleeting moments. A baby’s first steps. A first kiss. Graduating from high school. A 25th-anniversary dinner.

Social media has allowed us to share these short but BIG moments with our friends. So others can experience the highs in our lives and connect with us.

But there’s a flipside:

When we share these significant moments, they stay shared forever. Our special moments become less significant because they become permanent fixtures of our social media. Do the first steps of our baby really belong beside status updates about what we ate for lunch or what we watched on TV last night?

Our fleeting moments are no longer so short on social media. They exist til we say otherwise.

Enter Snapchat.

Snapchat became popular because of its lack of permanency. Users send each other photos which self-destruct after being viewed.

When the app was first released, many people couldn’t get their head around it. Why wouldn’t they want to keep their photos? Skip forward 5 years and Instagram and Facebook have released their own tools for temporary content.

So why does temporary content work so well?

Because it can make those fleeting moments special again. We can experience them, share them, then they disappear and are allowed to become memories.

Once more we can look back at milestones with fondness and nostalgia. Rather than be reminded of them time and again when we go on our social media.

Temporary social media posts also have an allure to them. They remind people that what they’re seeing is right now. Not something that happened last week.

That builds connections.
People feel like they’re there with you. Experiencing the moment.

Next time an amazing event happens, in your life, or even at your business, consider using Instagram or Facebook Stories to document it. Give your followers a chance to connect.Create some happy memories of your own.

Read More

At The Drawing Board: Creating A Saved Facebook Audience

Copy of Go! Blog Image Templates (900x350)
2May

Choosing an objective for your Facebook Ads is easy as it will correspond to your overall goal. It shouldn’t take too long to decide on what type of ad you want to run.

But before you even think about writing copy or creating media to go along with it, you must first think about who is going to view your ad.

Facebook has a powerful audience creation tool built into it and learning to use the tool is quite easy. But finding a good audience for your ad is a little tougher.

In the following post I’m going to explain how to Create a Saved Audience and the audience we decided on for our Facebook ads campaign.

Creating Customer Personas

Before you create an audience on Facebook, it’s worth sitting down and trying to think about who your customers are. This will help with your audience creation on Facebook, but will also help you to get an insight into who your ads will be targeting.

When creating your ads, it’s good to always keep your customer in mind. Think about what would engage them and what would spur them into action.

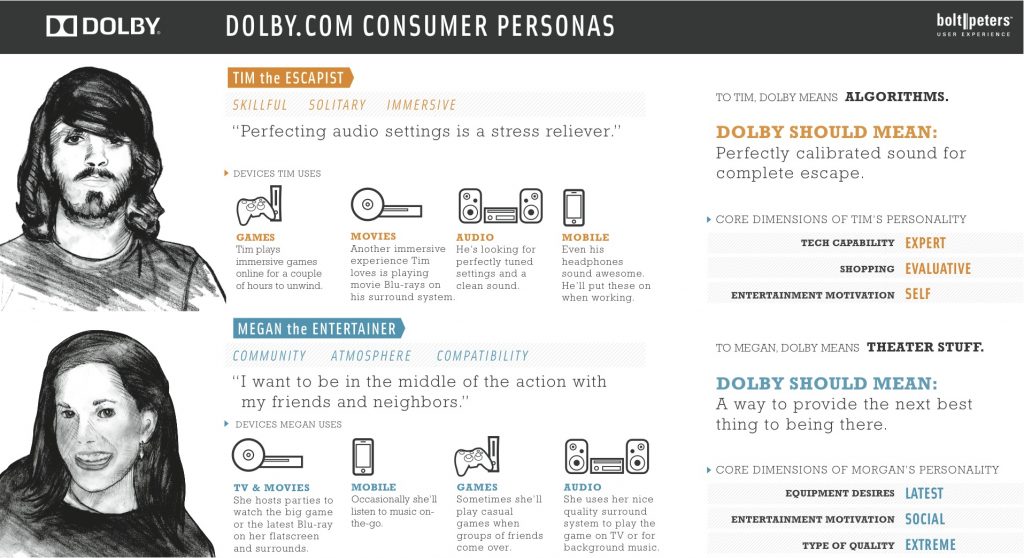
In order to help, we like to create personas for our potential customers. These are profiles which include all the demographic information about our various customers, whether relevant or not. The more the customer is described, the easier it is to find them and communicate with them.


The longer you’ve been in business, the easier this exercise will be. The more experience you have, the more you’ll know your customer. But creating personas may help you to think a little deeper.The profiles should include:

  • A name for the persona
  • Age range
  • Job Title
  • Location
  • Education
  • Interests
  • Family
  • Values
  • Fears
  • Goals
  • Challenges

To figure out our own personas, we spoke to our Vice President and Social Media Managers. They’re in touch with our clients and potential clients each day, so they know them well.

With their help we created our own personas.

Transferring Your Personas to Facebook

Now that our personas were done, it would be quite easy to transfer them over to Facebook. We decided we wanted to build as large an audience as possible so we chose a persona that would be broad.
The majority of our services are provided to local business owners so they would be our main target. We’d create a target audience made of:
  • Small business owners
  • Between 35 and 55.
  • That lived locally.

Entering our business account, we used the menu to go to the Audience section, where we chose to “Create a new Saved Audience.”

From there we gave our audience a name and transferred our focal points over to the audience.

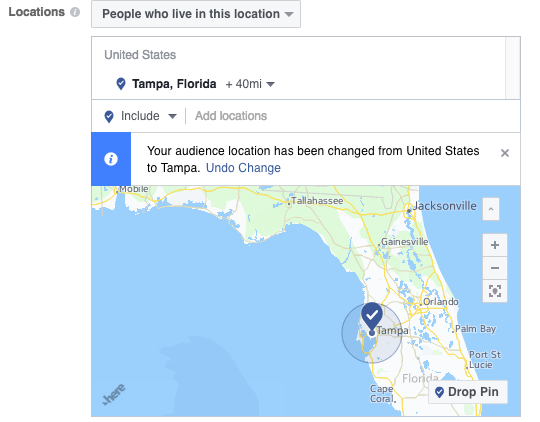
First, the local audience. We decided this would be anybody within a 40-mile radius:


Then the age to narrow down the audience a little:

And finally the fact that we wanted the audience to be made of small business owners:

With the details entered, all we needed to do was to click, “Create Audience,” and that audience could then be used for an ad campaign.
It’s worth noting that Facebook can create audiences as broad and defined as you want them to be. You could send your ad to an audience as large as everybody in the USA. Or you could send it to every 30 year old in a certain zip-code.

In our case, we decided to start off with a broad audience at first and refine it over time. We felt this would be a good way to keep our ad price down and also figure out how to hone in on more specific potential customers.

However, the other option is to dive straight in with your personas. If you’re selling diapers then it’s common sense that you want to sell to women who have recently had a baby. But if you sell special organic diapers, maybe you could also narrow your audience by choosing women who are also interested in organic foods. That way you’re hitting the perfect customer with your ad.

The golden rule is, the better you know your customer, the easier you can find them and create an audience based on them. So start thinking about your customer, who they are and what they like. That way you can target them.

Read More

At The Drawing Board: Learning About Facebook Ad Objectives

Copy of Go! Blog Image Templates (900x350) (1)
26Apr

In the last post in our At The Drawing Board series, I wrote about deciding on a marketing strategy. In this post, I’m going to talk about the first part of our strategy: Facebook Ads.

We decided that Facebook Ads would be a good way to bring leads into our funnel and raise awareness of our company and services. From our ads, we’d collect email addresses so that we could stay in contact with leads via email marketing.

But just deciding to use Facebook Ads is the easy part. Planning Facebook Ads is a whole different ball game.

Facebook Ads come in many types, which are ever changing. The type you choose is based on the objective you want to complete.

In our case, our objective was to collect email addresses, which gave us a few options:

  • Conversions – An ad run with the objective of converting users. The ad pushes a user towards your website with the aim of the user completing a specific action. (Such as, in our case, filling in our email form.)
  • Traffic – This type of ad aims to push users towards a particular website. (In our case, it could be a landing page for our email list.)
  • Lead Generation – An ad that collects contact information from users directly within Facebook, providing you with a list of people that signed up.

There are a few other objectives that didn’t seem like they would be as relevant to us:

  • Brand awareness – Making more people aware of a Facebook page and brand.
  • Reach – Showing an ad to the maximum number of people
  • Engagement – Getting people to engage with a Facebook page’s posts. (Increasing reactions, comments, likes, etc.)
  • Video views – Getting people to view a video.
  • App Installs – Having users buy and install an app.
  • Product sales – Aiming to get people to buy products from an online store.
  • Store visits – Having people visit your real world location.

Many of these ad types seem similar but have small differences beneath.

So what are the main differences between ad types?

  1. The options are given for how the ad looks and works. Since each ad is based on a certain objective, each one looks different. A video views ad will consist of a video and text, while an engagement ad will only show a post from your Facebook Page. Some ads show a button, while others like the lead generation ad are unique and contain forms that can be filled in.
  2. How the ads optimize. Once you run an ad for a certain amount of time, Facebook can automatically optimize it in the background so that your objective is more easily obtained. With that in mind, it needs to know what you want from your ad so it can help you get there.

With all of this in mind, since we were looking to collect email addresses, we decided to start off with a conversions ad.

Our basic plan was that our ad would direct users to a page where they would enter their contact details. Those who entered their details would have converted, which was the main goal we wanted to strive for.

However, we could have used other types of ads too. Any good Facebook Ads campaign will try out some ad types to find the one that works best and completes an objective for the least amount of money.

Read More

The Worst Facebook Page In The World: Responding to Positive and Negative Reviews

3
18Apr

In my last post in our series about The Worst Facebook Page In The World, we discussed the importance of customer reviews on a Facebook page, along with reminding you that details on your page should be accurate and up-to-date.

This time, I’m going to talk about how a business should interact with users on Facebook whether the customer has something positive or negative to say.

Should You Respond to Facebook Page Reviews?

The golden rule when it comes to comments and reviews is that with a few exceptions: you should respond to everybody.

First, think of it this way. If somebody has taken the time out of their day to write you something, it’s just basic good manners to respond to them. The only thing it will cost you is a moment of your time.

Not responding could give off the impression that you don’t care.  Not just to the person that left the comment, but anybody that sees the review on your Facebook page.

Responding to Positive Facebook Page Reviews

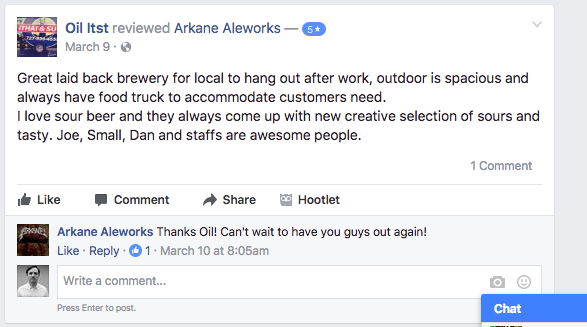
A brewery near our agency shows the power of replying because they reply to every. Single. Review.
It does help that they have a lot of positive reviews. But they also understand that this is:
  1. A chance to interact again with previous customers to leave a good impression.
  2. An opportunity to show potential customers how nice they are.

While I wouldn’t go as far as to say that responding to reviews will increase a business’s revenue, I would say that it leaves a good impression which is never a bad thing.As I mentioned in my last post, many business owners forget that the customer experience doesn’t start when somebody enters the physical location. It starts online when someone looks at your website or Facebook page. So you need to make your Facebook page show that the actual customer experience will be a good one.

But more than that, by creating a social media presence that people want to engage with, you’ll keep your business in the mind of old customers to build their loyalty.

Even the best businesses can’t keep everybody happy all of the time though. Eventually, everybody gets something everybody fears: The Negative Review!

Responding to Negative Facebook Page Reviews

Getting a negative review, especially one where your business wasn’t at fault, can be infuriating. It can make you feel angry and annoyed. You may even be tempted to set the customer straight.

A word of advice: No matter how bad a review makes you feel, NEVER TAKE THE BAIT!

By responding to a negative review with anger, you’ll only hurt your business.

The best case scenario is that a potential customer sees you responding negatively to a customer and decides they’d rather go elsewhere.

The worst case scenario is your negative review could snowball into a full on social media witch-hunt leading to a boycott of your business. (It happens!)

Now, as I mentioned earlier in this post, you should always respond to your reviews, even the negative ones. So how do you respond to a negative review?

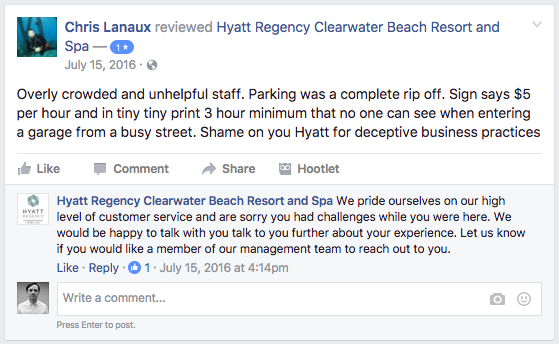
First put on your best customer service hat. You need to act professional, empathize with the customer and also apologize. Here’s a perfect example from a nearby hotel:

Disagreeing with the customer isn’t needed. Simply an apology and being open to the customer to let them (and everybody else) knows that their negative experience is something important.

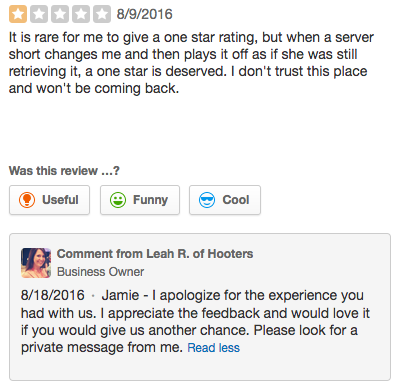
The original Hooters in Clearwater also offers a good example of replying to negative reviews on its Yelp page.

Again, it’s a simple apology followed by an offer to open up a dialogue with the customer.

In both cases the business wants to bring the dialogue off the public Facebook page and into a more private setting, so no more damage can be done on social media, but also so that they can make it up to the customer in a private setting.

By replying to negative reviews, potential customers will see that your business cares. Although you can do little about the black mark on your social media, you can play it to your advantage in how you respond to it.

Of course, the best way to tackle negative reviews has nothing to do with social media. It’s to ensure your customers all have a positive experience when they visit you, so they don’t feel the need to leave negative reviews in the first place.

However, you can use your social media reviews to take a note of where your business can improve and what needs to change in future. While also giving yourself some credit for what you customers tell you you’re doing right.


Read More

At the Drawing Board: Deciding on a Marketing Strategy

at the drawing board marketing strat
12Apr

In our last post in the At the Drawing Board series, I discussed the very first stages of one of our marketing campaigns. Myself, Chris (our CEO) and Dale (our VP) met to discuss a goal for our campaign. In the end, we decided we wanted to promote our Facebook Ads service as we believe it’s something we excel at.

During the meeting, I took down all of our ideas and later tried to form them into a concrete plan.

To do this, I first wrote down:

  • The goal for our campaign. What we wanted from it. This we settled on as bringing more clients in for Facebook Ads Consultancy.
  • Who our campaign was going to be targeted to. In this case, local businesses seemed a good starting point as they would most benefit from using Facebook Ads.
  • How people would find out about our campaign. Such as on social media, through our emails or (mainly) through running Facebook Ads.
  • What options we had for turning potential clients into actual clients. Our blog, social media, email marketing and customer service.
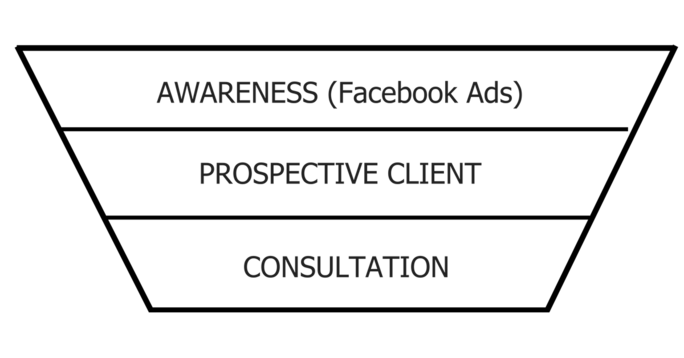
Once these were written down, we could easily form a small funnel to visualize the bare bones of our campaign.

At the top of our funnel, people would become aware of us and our services. From there they would become a prospective client, which would eventually turn into a consultation.

Creating this diagram allowed us to think more about how we would turn people aware of our service into clients.

We already knew our first step, where we made people aware of our service would be done through the use of Facebook Ads. But how would we turn people that had seen our ads into clients?

Possible options were:

  • Create a drip fed email marketing campaign that would send emails automatically to people on a mailing list to build their trust, before pitching our services to them in an email.
  • Capture phone numbers of potential customers and call them up to work out whether they could use our services.
  • Pass people on to our website or social media in the hope they’ll start to follow us and eventually decide to use our services.
  • Capture physical addresses and send them marketing materials through the mail.
Chris and I decided a drip fed email campaign would be the best option, as it would mostly run itself once set up, it would keep us in contact with people in our sales funnel and allow us to market to them. This allowed us to change our diagram:

With this diagram in place, we had a strategy that we could work on, and our campaign was starting to take shape. This gave us some tasks that we would need to do next:
  1. Think up a Facebook Ads campaign that allowed us to collect the email address of people interested in our service.
  2. Write and create an email marketing campaign based around our theme of Facebook Ads consultation.
  3. Plan a timeline for our campaign showing us when it would start and when the content would need to be created for.
In my next post, I’ll discuss the first stage of our funnel, the Facebook Ads campaign. How we expanded on our ideas to create something more substantial. Meeting with our Copywriters and Social Media Managers for input to create a campaign map.
Read More

The Worst Facebook Page In The World: Cover and Profile Pictures

facebook on phone
4Apr

Today I’m going to introduce you to The Worst Facebook Page In The World. If you’re sitting there right now thinking, “Uh oh, I hope it’s not my page” then don’t worry. I made this page myself just to illustrate some social media failings.

Over the next few weeks, I’m going to go through The Worst Facebook Page In The World, section by section, to show you common social media mistakes and how to overcome them by using the correct practices.

This week, I’m going to focus on the profile photo and cover image.

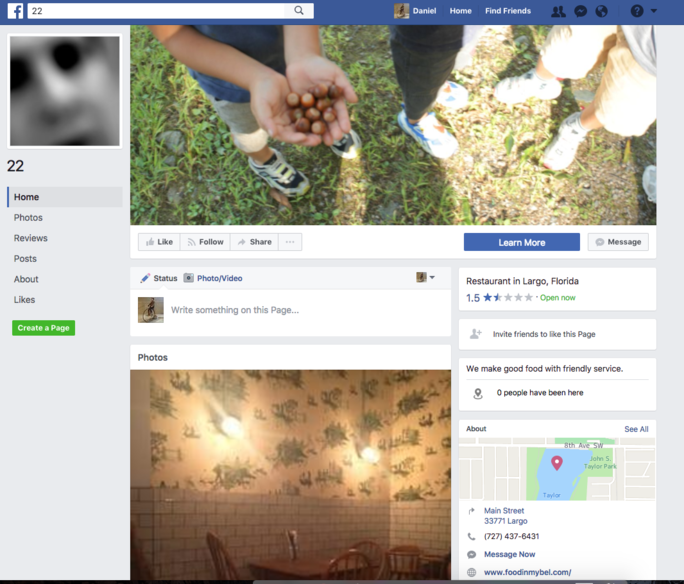
Let’s take a look:

Now you know what they say; you only get one chance to make a first impression and straight away my first impression of the page is, “BLEURGH”.

Facebook Profile Pictures

When any new person comes to a Facebook page, the first thing that they’ll see is your cover image and profile picture. So if they stink, your whole page stinks! Immediately we can see the issue with the page.

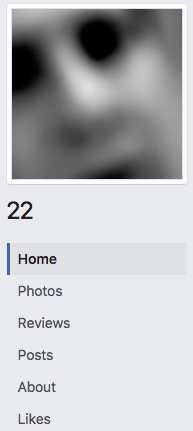
For starters, their profile photo has nothing to do with the business. (We can’t even tell if they are a business!) It’s a blurry, out of focus shot of somebody’s face. Maybe it’s the owner? Who knows.

The quality of the photo is an issue, but even more of an issue is the content. A business can live or die based on its branding, and it seems this business has no logo. Or an owner that didn’t think to place their logo on their website.

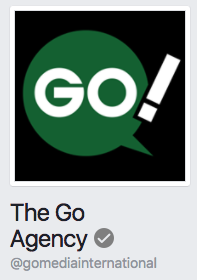
What about some good examples, though? Well, what do you know! The Go! Agency has a perfect profile picture.

We’ve chosen to use our logo as it pops out on the page and is well connected to our brand. The great thing about using your logo as a profile picture is that it will get peppered around your page, but also on other pages when you leave a comment, or somebody shares one of your posts. A good logo will pop out from the page and be instantly recognizable.


Facebook Cover Images

Next up we have the cover image.

Having a branded, clear cover image is important just for the simple fact that it takes up 1/3rd of a visitor’s screen. Think of it as a virtual store front.

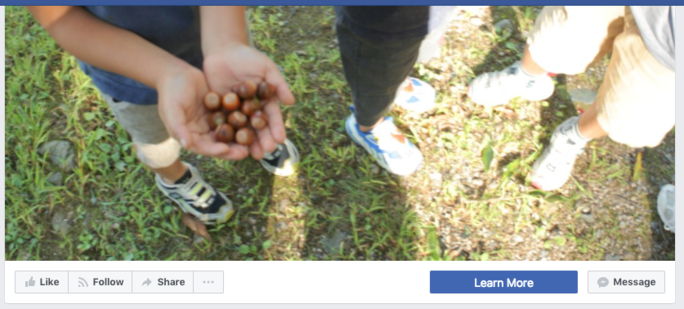
In this case, the owner has decided to put up a random photo of feet and hands, which tells us nothing. It doesn’t inform visitors of what the business is, it doesn’t stir any emotions and worst of all, the photo is blurry and bad quality. Going back to that idea of the store front – how would a customer react in real life if this was plastered over the store window? Probably with bewilderment.

By this point, I’d imagine a good amount of visitors would have left the Facebook page. Two terrible photos are all it takes sometimes. We’re often told to “Never judge a book by its cover, ” but we all do it.

In this case, most people would judge that this business doesn’t care too much about their Facebook page, which kind of leads us to assume they don’t care about their business either.  It doesn’t make you believe in them as a legitimate business.

The most annoying thing about this is that this first impression relayed no information about the business at all. None. Can you tell me what the business even does? It’s impossible to tell at first glance, which is how new visitors would feel.

Now here’s a cover image used by one of our clients:

It hits the mark well because it instantly tells the visitor what this business does, where it’s located and also features a relevant photo that puts forward positive emotions. Most important of all though, it looks good. (Probably because we had our graphic designer make it…)

You’re probably thinking, “Well duh! We’re not that stupid.” But we’ve seen these basic rules broken time and again. Sometimes you just don’t know what you don’t know!

In my next post about the World’s Worst Facebook Page, I’ll be showing you why it’s important to keep your page up-to-date and some good practices for dealing with negative reviews.

Until then, you can sign up for our newsletter below!


Read More
x
Bulletproof Marketer