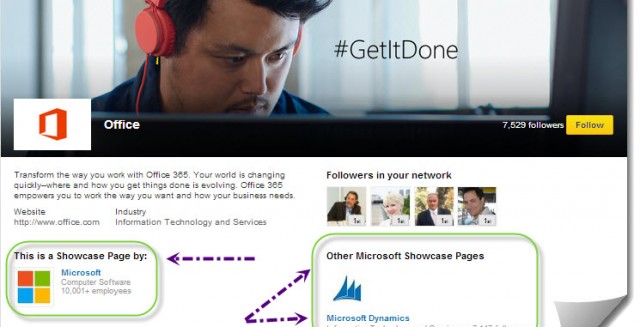
If you have been keeping up with the content I share here on our blog, as well as on my radio show “The Social Marketing Academy”, you will know that I am a huge proponent of the power of using LinkedIn to promote and brand your business online. The sheer number of possibilities available to your business on LinkedIn is seemingly endless.
Aside from your professional LinkedIn profile (which is where you go when you log into your LinkedIn account) you also have the opportunity of creating a LinkedIn Company Page. I’m sure that many of you reading this already have LinkedIn Company Pages and have packed them with the information your target market would find engaging.
But did you know that LinkedIn has recently made a major change to that Company Page?
If you are reading this now, your LinkedIn company page no longer has a “Products” or “Services” page – as well as a featured products and services splash page. This page appeared on the top tab next to your logo and when you clicked on it, you were able to see the list of products and services as well as an optional splash page to further engage your audience.
While this leaves a huge void in your Company Page – trust LinkedIn to already have the solution ready for you to use. In order to help companies focus more on sharing information regarding specific services that are offered by their companies, LinkedIn has created “Showcase Pages” which allow you to create a custom page for each individual product or service that your business offers.
These pages can be very useful in increasing visibility to key service/product offerings that you want to focus on, so let’s get you started in creating your first Showcase Page today!
Here is a quick step-by-step guide to getting your LinkedIn Showcase Page up and running in just a matter of minutes:
- From all of your products/services, choose your most popular one to focus your first Showcase Page around.
- Go to your LinkedIn Company Page and then click the “Edit” tab on the right-hand side. On the drop-down menu, choose “Create a Showcase Page”.
- On the box that pops up, add your Showcase Page Name – which would be the name of the product or service that you have chose to feature. Then choose the page administrators (you will be shown as a default administrator) and click “Create Page”.
- This will now take you to the main “Overview” section of your Showcase Page. This is where you have to get your branding right. It all starts off with your Full Width Image. This will be similar to your Facebook Cover Image and should be inline with the branding you use on your website or online point of sale. Make sure that this is 974 x 330 pixels or larger with a maximum file size of 2MB. It can be in PNG, JPEG or GIF formats. Click “Add Image” and then choose it from your files, upload and click “Save”.
- Now you will see a gray box where there are 3 items you need to complete. First, choose the language you want to optimize your Showcase Page Name and Description for.
- Next make sure that your Showcase Page Name is correct, and then move onto the Showcase Page Description section. Here you need to briefly describe your product or service and let your target audience know what to expect from this page. The catch? You only have 200 characters to do it with – so you have to get right to the point! Note: I think this is the most challenging step of creating the Showcase Page.
- Designated Admins: here you can add or change the administrators that you chose when you first created the Showcase Page.
- Logos. Now you have to choose your logos for the page (which is very similar to when you create your Company Page in the first place). If your product or service has its own unique logo, then add it here. If not, use your company logo in these spaces. Make sure that your standard logo is 100 x 60 pixels and your square logo is 50 x 50 pixels. These will be used in your Showcase Page’s network updates, so make sure it is on-point!
- Featured Groups. Do you have a custom LinkedIn group directly associated with the topic of your Showcase Page? If so, add it to the Featured Groups section by typing in the name and choosing it from the list provided.
- Next scroll up to the top, and on the right-hand column you will see a spot that asks you for your Showcase Page Website URL. Copy and paste in the URL from the page in your website that is directly associated with the product or service you are featuring on your Showcase Page.
- Now choose your Main Showcase Page Industry from the drop down list.
- If you want to associate your Showcase Page with your company, click “Enable”. If not, leave the box unchecked.
- Click Publish!
Now you have created your first Showcase Page!
But what now?
Now you will be able to share updates to this Showcase Page that are SPECIFIC to the product or service. Say for example, that your company is an assisted living facility and you have created a Showcase Page around your “Memory Care” service. So, when you go to post updates to your page, these posts will be related to your memory care service, memory care topics and other related items that would interest those members of your target market who you want to engage with your page.
Essentially Showcase Pages are Company Pages on steroids as you can provide a full page of useful information related to a specific product or service. Make sure that you are able to post on a consistent basis and make sure that you promote them to your extended networks online and off.
Need Online Marketing Help?
Fill Out the Form Below and We Will Get Right Back to You!
[ninja_forms_display_form id=1]


